What is the best way to import a PDF into Revit? Can I export my sheets in custom sets and print them in large sizes? The following guide will walk you through all the steps.
Importing PDFs is similar to inserting raster images into views, except that you can bring multiple pages and images into a document and then snap to vector elements on an imported page (e.g. pick lines in the view).
The native link tool tracks each page in a shared project and will continue to do so when the project is upgraded to later versions of Revit.
Method 1 – Import PDF (via Link)
Insert documents by linking them to an RVT project.
Steps
- In a 2D viewport, go to the Insert tab > Link panel > Click Link PDF.
- Select the document.
- Select a page to import in the viewport.
- Adjust the resolution.
- Click OK.
✨ Tip: To make the page appear on top of other elements in the view, go to the Options bar > Modify | Raster Images > Change “Background” to “Foreground”.

Edit
In the Manage Links window you can change the properties of documents.

- Add: Links another page from a PDF document.
- Place Instance: Inserts the page into the viewport.
- Show: Switches to the viewport where the instance was inserted.
- Import: Import loaded pages into the project.
- Reload From: Replaces the source file.
- Reload: Refresh the page in the viewport.
- Unload: Removes a file link within a project.
- Remove: Removes a file completely from the list.
Learn how to change the transparency properties
When a file is linked to an RVT project, it can be attached to any subsequent version and the PDF graphics are automatically updated when changes are made to the file. Teams can collaborate and update the model while the files remain linked to the project.
Linking can reduce the number of individual files that are imported into your project file and is very useful for maintaining the size of the RVT file.
Select the imported PDF instance in the viewport > Go to the Properties palette > Dimension panel.
- Resize the instance by changing “Width” and “Height” values.
- Scale page in-view by adjusting horizontal and vertical scale values.
- Pick Lines of a pdf image by checking Enable Snaps.
Snaps work only for documents that contain vector data (PDF, DWG, EPS, Ai, etc.). Learn more about snapping to PDF
Method 2 – Export PDF
Export 2D and 3D views to PDF format.
Steps
- Go to the File tab > drop-down Export menu > Click PDF.
- Adjust the settings in the PDF Export window.
- Click Export.

Edit
- Select views or a group of sheets.
- Assign a name and a location.
- Adjust the resolution and size of the sheets.
- Hide and edit references, view options, and linked elements.

It is recommended to use vector processing when adjusting the resolution, as this preserves the vector nature of the objects.
3D PDF Exporter – Revit Plugin
Did you know that Acrobat is a free, offline Revit viewer? Read our tutorial to learn how to export 3D views and cameras to a 3D PDF document.
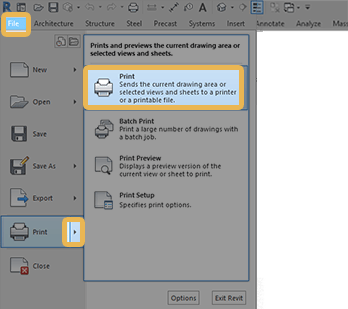
Print to PDF
How to use PDF documents to print sheets and views.
Step 1 – Go to the File tab > drop-down Print menu > Click Print
Name the new PDF file and save it where you want.
- In the Print window, drop-down Name menu.
- Select Adobe PDF > click OK.
- Specify a destination for the document.
- Click Save.
Step 2 – Select sheets
Select the views and sheets to convert and print.
- Adjust document properties.
- Select certain views or a set of sheets to be exported as a document.
- Setup printing settings.

Step 3 – Change page settings
Choose a size from the “Page Size” drop-down menu or click “Add” to assign the dimensions.
To create a customized page export:
- Assign a name to the new page, adjust the unit and paper size.
- Click Add/Modify > drop-down the Page Size menu.
- Select the saved page name.

Step 4 – Create view/sheet sets
Sets are linked in your workflow and allow you to export multiple documents at once. They are an introduction to managing large projects with multiple outputs.
✨ Tip: Save a selection set for future use.

Step 5 – Print setup
You can also access “Print Settings” from the File tab > drop-down Print menu.
- Click OK when prompted to save your changed print settings.
- In the window that appears, clicking Yes applies the settings to future sessions; clicking No applies them only to this session.

These settings are saved with the project so that they can be used across multiple sessions. Learn more about printing to scale
Vector VS. Raster
Revit automatically uses vector processing; select raster processing only if the view requires it:
- is a Realistic / Raytrace view.
- is a Point Cloud View.
- Contains Decals or Raster Images.
- Contains shadows, gradients, or sketchy lines.
Vector files are better suited for digital illustrations and complex graphics because vectors retain their original resolution even when resized. They can be printed in a variety of formats.
Mohamed Fakhry has helped thousands of architects and designers find their next project with step-by-step guidance on his blog, mashyo.com. About Mohamed
His journey began during his university years when he recognized the need for information-rich 3D models to accelerate learning and improve production processes. Now, Mohamed shares his expertise through Revit tutorials that are accessible to all.
