Ever wondered why your Revit models feel off, no matter how hard you try? Misaligned walls, stubborn grids, and endless tweaking can drain your time and patience.
Here’s the secret: mastering Revit snaps can transform your workflow overnight.
In this guide, you’ll learn seven game-changing tips to nail precision and speed up your process — whether you’re snapping to PDFs, topography, or tricky imported geometry.
Snaps Settings
The settings window contain check boxes to turn snaps on and off. You can also change default angles and dimension increments.
To change settings of snaps:
- Go to the Manage tab > Settings panel > Click Snaps.
- In the dialog box, check or uncheck boxes to enable/disable snap types.
- Adjust Length Dimension Snap Increments for precise measurements.
- Modify Angular Dimension Snap Increments for angle-based snaps.
- Click OK to save.

Related Reading: Check out our previous post on keyboard shortcuts to speed up your snap adjustments!
Snap to PDF
Snapping to PDFs can streamline workflows when working with imported underlays, but it only works with vector PDFs, not raster ones.
The option to Enable Snaps will be greyed off when your PDF is raster and doesn’t include vector information.
To snap to lines of a PDF page:
- Import or link a PDF via Insert tab > Import panel > PDF.
- Increase the DPI during import (e.g., 300 DPI) for sharper vector lines.
- Select the PDF in the view.
- In the Properties palette, check Enable Snaps.
- Click Apply.


Your PDF is raster-based? Convert it to a vector format using tools like Adobe Illustrator or read our guide on tracing images in Revit.
Related Reading: Read our tutorial on RVT to PDF conversions and settings.
Center of Circles
Snapping to the center of circles is a handy trick for aligning elements like columns or fixtures.
Quick Method: While placing an element, press SC on your keyboard to snap to the circle’s center.
Another way to align with circle centers:
- Select the circle.
- In the Properties palette, check Center Mark Visible.
- Click Apply. The center mark appears, making it easier to snap to.
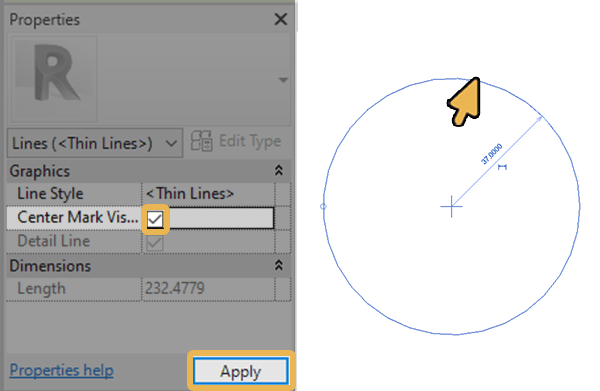
When to Use:
- Aligning radial patterns (e.g., lighting layouts).
- Positioning elements concentric to circular features.
Turn Ortho ON or OFF
Ortho mode locks drawing angles to 0° and 90°, ideal for straight walls or lines.
How to Toggle Ortho:
- ON: Hold Shift while drawing, moving, or copying elements. The Constraint box in the Options bar activates.
- OFF: Release Shift or uncheck the Constraint box

Practical Use:
- Use Ortho for grid-based layouts (e.g., floor plans).
- Turn it off for angled or organic designs.
Ortho mode ensures clean, perpendicular lines with minimal effort.
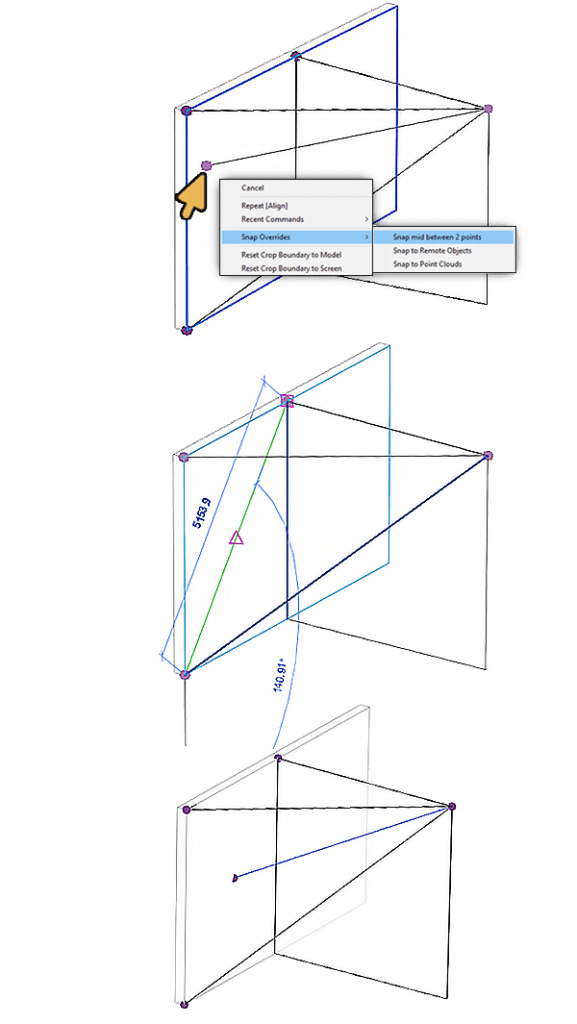
Snap Between Two Points
Introduced in Revit 2022.1, this feature places elements precisely midway between two points in 2D or 3D views.
Steps to Snap Between Two Points:
- Start placing a component (e.g., a door or column).
- Right-click > Snap Overrides > Select Snap Mid Between 2 Points.
- Click the first point.
- Click the second point. The element snaps to the midpoint.

Note that the snap overrides menu contains other commands: You can switch between them by pressing the “TAB” key while moving the mouse pointer over shapes, lines and points.

Now you know the steps to efficiently use snaps in any sketch mode, including the conceptual modeling environment…
3D Snapping
3D snapping enhances precision when modeling in 3D views or conceptual masses.
How to Enable 3D Snapping:
- Go to Massing & Site tab > Conceptual Mass panel > Click In-Place Mass.
- Name the mass > Click OK.
- In the Draw panel, select a tool (e.g., Line, Rectangle).
- Check 3D Snapping in the Options bar.

To use other snapping commands while sketching in a 3D view:
- Place the first point of the line.
- Right-click > click Snap Overrides > Select a command.
3D snapping is a game-changer for complex geometries. See our video tutorial for an exercise:
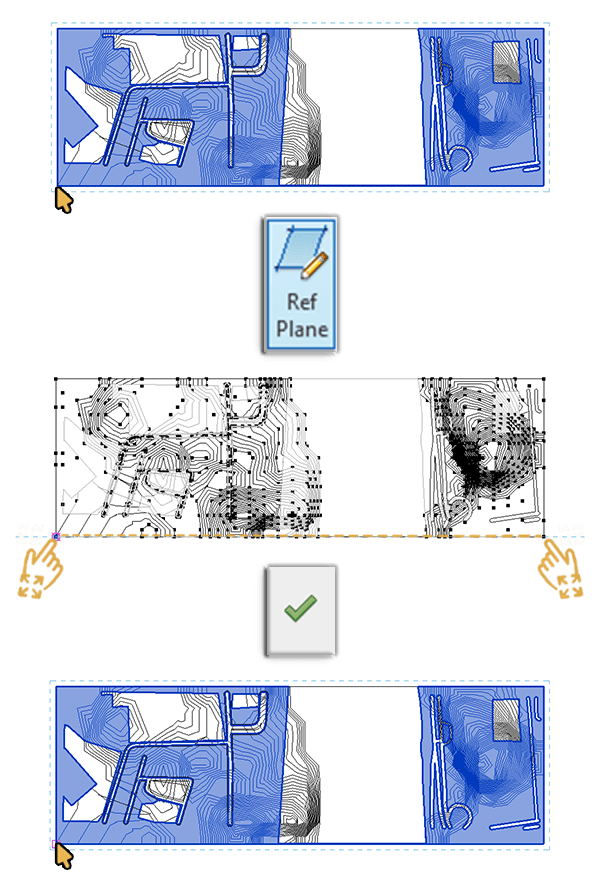
Snap to Topography
Snapping to topography ensures compatibility when updating surfaces or aligning elements.
The easiest way to snap to topography boundaries is to add a reference plane using topography points in edit mode.
Method 1 – Using Reference Planes:
- Select the topography.
- Go to Modify | Topography tab > Click Edit Surface.
- In the Work Plane panel, click Reference Plane.
- Sketch a reference plane along the topography edge.
- Click Finish Surface.
The ability to select topography lines to add hatch patterns or other details in all views is still just as important. To work around this problem, we export the view to a two-dimensional DWG file and then import it back.
Method 2 – Export/Import for Line Snapping:
- In the desired view (plan, elevation, section), export the topography as a DWG.
- Re-import the DWG into the view.
- Snap to the DWG lines for detailing.
✨ Tip: Remove and purge imported files when done to keep your model clean.
Mastering Revit snaps is a skill that pays off in faster, more precise modeling. From configuring snap settings to snapping to PDFs, circles, and topography, these seven tips — plus bonus techniques — equip you to tackle any project with confidence.
What’s Next?
- Share your favorite snap tip or question in the comments below.
- Subscribe to our newsletter for more tutorials.
- Download our exclusive Revit tools and families to take your skills further.
Mohamed Fakhry has helped thousands of architects and designers find their next project with step-by-step guidance on his blog, mashyo.com. About Mohamed
His journey began during his university years when he recognized the need for information-rich 3D models to accelerate learning and improve production processes. Now, Mohamed shares his expertise through Revit tutorials that are accessible to all.
