Zoom extents are the visible area in Revit viewports. In this tutorial, you’ll learn how to effectively navigate them, the basics of zooming, orbiting and panning, as well as plug-ins and tips to speed up your workflow.
The navigation bar tools allow you to view your models from different angles. You can instantly zoom in to see specific elements of your model in detail, orbit around to view it from different perspectives, and pan across its surface.
ViewCube
A 3-dimensional cube in the upper right corner of the user interface to orient your model in 3D views.
The cube resembles your model. Left-click and drag it to change the orientation.

Steps
- Right-click the viewcube.
- Drop-down the “Orient to” menu > Select a view name.

Want to get creative with the viewcube?
Learn how to create 3D animated GIFs
Navigation Wheel
A tool that allows you to see and use all navigation options in 2D and 3D views.

Steps
- Go to the Navigation bar > drop-down Navigation Wheel menu.
- Click Full Navigation Wheel (shortcut: F8).

Learn more about the SteeringWheel
Zoom Extents
Details: Display the view area where your elements are located.
Steps
- Go to the Navigation bar > drop-down Zoom menu.
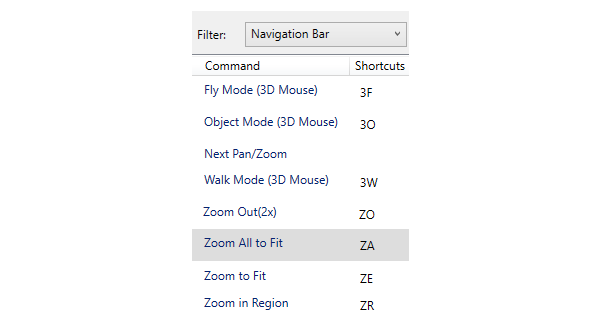
- Select Zoom to Fit (shortcut: ZE).
- Click the Zoom icon in the navigation bar.

Edit
Different types of zoom options in the menu.
- Zoom in Region: Draw a triangle that defines view extents.
- Zoom out (2x): Divide the size of the view by two.
- Zoom All to Fit: All active views are zoomed to show visible elements.
- Zoom Sheet Size: Match printed size based on view scale.
- Previous Pan/Zoom: Return to the previous zoom state.
Zoom to Selection
Install BDThought’s add-in to zoom the view to all selected elements.
- Select one or more elements in the project browser.
- Go to the Add-ins tab > Revit DBLink panel > click Zoom To Selection.
Orbit
Details: Move spherically around your model elements.

Steps
- Select an element to set a new pivot point in its center.
- Click and drag the ViewCube to change the orientation of the model.
Shortcut
Hold down the SHIFT key + click the right mouse button + drag the mouse to rotate.
Pan
Details: Move the view as a flat image (2D path).

Steps
- Open the Full Navigation Wheel.
- Click the “Pan” wedge and then drag the pointer to move the view.
Shortcut
Click the scroll wheel + drag the mouse to move.
Practicing using these tools in different views can help you improve navigation in all types of Revit projects.
Mohamed Fakhry has helped thousands of architects and designers find their next project with step-by-step guidance on his blog, mashyo.com. About Mohamed
His journey began during his university years when he recognized the need for information-rich 3D models to accelerate learning and improve production processes. Now, Mohamed shares his expertise through Revit tutorials that are accessible to all.


