Did you know that there are two different types of 3D views in Revit? The unusual perspective and the default orthographic view, both of which can be customized to other types.
In this tutorial, you’ll learn about the different types of projections and how to create and set up each view for a specific purpose.
Learn how to use the navigation bar
| Projection | Orthographic | Perspective |
|---|---|---|
| Definition | Parallel lines remain parallel and all parts have the same size. | Mimics the perception of the human eye, with objects getting smaller the further away they are. |
| Use | Technical drawings and architectural plans. | Photorealistic renderings or animations. |
| Advantages | Accurate measurements, clear display of details. | More realistic look. |
| Disadvantages | Can seem flat and uninteresting. | Can be difficult to understand and measure. |
3D Views
Details: Create a 3D view of your project.
3D views are visual representations of objects or scenes in three dimensions, meaning they have height, width, and depth.
Steps
- Go to the View tab > Create panel > drop-down 3D View menu.
- Click Default 3D View.

Orthographic drawings are flat and are often used to show detailed information about the dimensions and construction of a building or object.
Perspective drawings are often used to give an idea of how a building or object will look once it is built. Learn how to lock 3D views in Revit.
✨ Tip: 3D views can be explored and manipulated using a variety of tools, including software and online viewers.
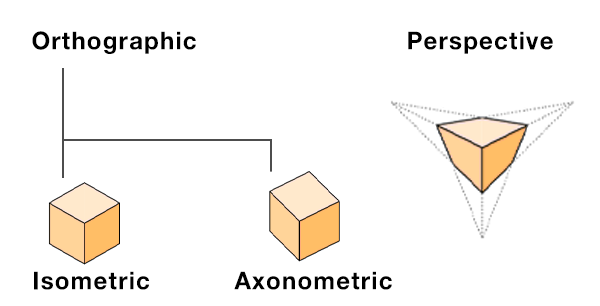
Orthographic VS Perspective
Details: Change the 3D view projection.
Orthographic views show a building from a flat, 2D angle. Perspective views, on the other hand, give a more realistic, 3D look.
An orthographic view can be scaled in Revit 2024, while scaling a perspective view requires the use of the Crop Size tool. Learn more about scaling 3D views
Steps
- Right-click on the view cube.
- Select a projection type.

To create these views, we used a perspective section. Learn how to create section boxes
Isometric VS Axonometric
The main difference between the two is the angle of the projection.

Use the full navigation wheel to control the orientation of the model.
Learn how to create axonometric views
| Projection | Isometric | Axonometric |
|---|---|---|
| Definition | All angles are equal and the scale is uniform in all directions. | Shows the model from a fixed angle, with the scale of each axis different. |
| Use | Graphics for video games or building designs. | Blueprints and exploded diagrams. |
| Advantages | Easy to understand and measure. | Allows more flexibility for different professions. |
| Disadvantages | May seem less realistic. | Can be more difficult to understand and measure. |
Each type has its own intended use. Orthographic views are great for technical drawings and construction documents. Perspective views are ideal for 3D renderings in presentations and design reviews.
In orthographic mode, isometric images show the 3D effect of a building. Axonometric images are ideal for showing a building from a specific angle.
Mohamed Fakhry has helped thousands of architects and designers find their next project with step-by-step guidance on his blog, mashyo.com. About Mohamed
His journey began during his university years when he recognized the need for information-rich 3D models to accelerate learning and improve production processes. Now, Mohamed shares his expertise through Revit tutorials that are accessible to all.
