Enscape for Revit is a real-time rendering plugin that lets you walk through a Revit model, adjust materials and lighting, add entourage, and export images or videos without leaving your BIM workflow. To open it, install Enscape, open a Revit project with a valid 3D view, go to the Enscape tab, and click Start.
This updated 2026 guide shows the full beginner workflow: install the Enscape plugin for Revit, find the toolbar, start the live viewport, prepare your model, improve the render, export images and videos, and fix the common problems that stop Enscape from opening correctly.
What Is Enscape for Revit?
Enscape is a live visualization plugin for Revit. Instead of exporting your model to a separate rendering program, you launch Enscape from the Revit ribbon and work in a second real-time viewport. When you change geometry, materials, design options, phasing, or visibility in Revit, Enscape can update the rendered view immediately.
That is why architects and interior designers often use Enscape during design meetings. It is fast enough for walkthroughs, but still includes tools for still images, panoramas, videos, VR, assets, lighting, material editing, and presentation exports.
| Use Enscape for | What it helps you do in Revit |
|---|---|
| Design review | Walk clients through a model while changing design decisions live. |
| Still renderings | Export fast interior, exterior, section, and detail images from saved views. |
| Material studies | Check texture scale, reflections, bump maps, and finish options in context. |
| Presentation videos | Create a simple camera path and export an animation from the model. |
| VR and panoramas | Share immersive views for design approval or stakeholder review. |
Before You Install Enscape
Before installing the Enscape Revit plugin, check these items. They solve most beginner problems before you even open the toolbar.
- Use the full version of Revit. Revit LT does not support third-party plugins, so Enscape cannot be added to Revit LT.
- Check version support. As of July 2026, Enscape 4.18.1 is the current Windows release listed in Chaos release notes and it adds Revit 2027 support. Always check the official system requirements before updating production machines.
- Use a dedicated graphics card. Enscape relies heavily on the GPU. Chaos lists 4 GB of dedicated VRAM as the official minimum and recommends 8 GB or more for practical work.
- Update graphics drivers. Outdated NVIDIA, AMD, or Intel Arc drivers can cause viewport errors, crashes, or missing ray-tracing features.
- Close Revit before installation. The installer needs to add the Revit plugin files while the host application is not running.
If you are setting up a new workstation, check Revit’s own system requirements too. Revit 2027 recommends 32 GB RAM or higher for balanced use, and complex BIM projects can need much more headroom than a small sample model.
How to Install Enscape for Revit
- Go to the official Enscape for Revit page or the latest Enscape download page.
- Download the Windows installer.
- Close Revit and any other supported host software before running the installer.
- Run the installer and keep Revit selected in the host application list.
- Open Revit after installation finishes.
- Look for the Enscape tab in the Revit ribbon.
If the tab does not appear, do a clean reinstall: uninstall Enscape, restart the computer, install Enscape again, then reopen Revit. This is the official first troubleshooting step when the Enscape menu is missing.
How to Open Enscape in Revit
Use this workflow when Enscape is installed but you are not sure how to launch it.
- Open your Revit project.
- Open an existing 3D view, or create one from View tab > Create panel > 3D View.
- Click the Enscape tab in the Revit ribbon.
- Click Start.
- Wait for the Enscape viewport to open.
- If you want Enscape to follow the Revit camera, enable Synchronize Views.
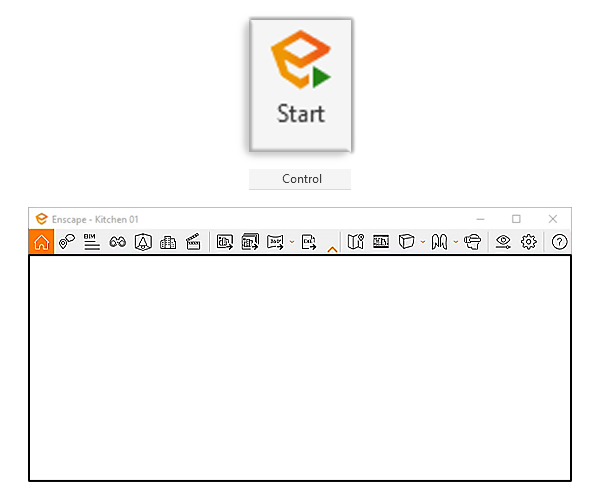
The Start button may be inactive at first. That usually means the current Revit view is not a valid 3D view. Switch to a default 3D view, perspective view, or camera view, then check the Enscape tab again.
How to Use Enscape in Revit: 10-Step Workflow
1. Create a Dedicated Rendering View
Do not render from a random working view if you want predictable results. Duplicate a 3D view and name it clearly, such as Enscape – Exterior Entry or Enscape – Lobby View. Then set the crop, section box, detail level, view template, phase, and design option for that specific presentation view.
This makes your render easier to repeat later. It also prevents construction-document visibility settings from ruining a presentation image.
2. Start Live Rendering
Open the dedicated 3D view, go to the Enscape tab, and click Start. Enscape opens in a separate viewport. You can keep Revit on one monitor and Enscape on the other, which is the cleanest workflow for modeling and reviewing at the same time.
3. Use Synchronize Views When Needed
Synchronize Views makes the Enscape camera follow the Revit camera. Turn it on when you want Enscape to match a saved Revit view. Turn it off when you want to navigate freely in Enscape without the view snapping back to Revit.
A practical workflow is to synchronize once to line up the camera, then turn synchronization off while you fine-tune the Enscape composition.
4. Navigate the Model
Use the mouse and keyboard to walk through the model. The common navigation style is similar to a real-time game engine: use the mouse to look around, scroll to move, and keyboard movement keys to walk. If the Help panel is visible in the Enscape viewport, use it until the controls feel natural.
5. Prepare Revit Materials
Enscape reads Revit materials, so the quality of your render depends heavily on how clean your Revit material setup is. Assign materials through categories, family types, and proper Revit families where possible. Avoid turning the model into a presentation-only file full of painted faces and in-place workarounds.
For better results, check texture scale, bump, glossiness, reflectivity, and transparency. Small material errors that are hard to notice in a hidden-line Revit view become obvious in a real-time render.
6. Add Assets
Use the Enscape Asset Library to add people, trees, furniture, vehicles, lighting props, accessories, and landscape objects. Assets help communicate scale and use, but they should support the design instead of distracting from it.

Keep assets realistic for the project type. A clean architectural rendering usually needs a few well-placed people, plants, cars, and interior objects, not a crowded scene that slows the model and weakens the composition.
7. Set Lighting, Location, and Time of Day
Lighting is usually the fastest way to improve an Enscape render. For exterior scenes, test morning, afternoon, and golden-hour sun angles. For interiors, balance daylight with artificial lights, and avoid leaving every light fixture turned on if it does not help the image.
For sun studies and realistic shadows, check the Revit project location and north orientation. If you only rotate the camera or crop, the sun direction may still be wrong.
8. Adjust Visual Settings
Open Visual Settings to tune the render style. Start with exposure, field of view, depth of field, white background or sky, image effects, and render quality. For active design review, use Medium or High quality to keep navigation smooth. For final export, switch to the highest quality your GPU can handle.
| Setting | Good starting point | Why it matters |
|---|---|---|
| Rendering Quality | Medium or High while working, Ultra for final images | Balances viewport speed and final detail. |
| Resolution | Full HD for drafts, Ultra HD for final stills | Higher output is sharper but uses more resources. |
| Field of View | Moderate, not extreme wide-angle | Reduces distorted interiors and stretched facades. |
| Depth of Field | Subtle or off for architectural documentation | Keeps the design readable. |
| Safe Frame | On before final export | Shows the real exported crop. |
9. Save Views and Presets
Once a view works, save it. Use named views for exterior angles, interiors, sections, and client presentation scenes. Save visual presets too, especially when a project needs a consistent look across multiple images.
This is also where you should decide whether the view belongs in the Revit model as a coordinated camera, or only in Enscape as a presentation viewpoint.
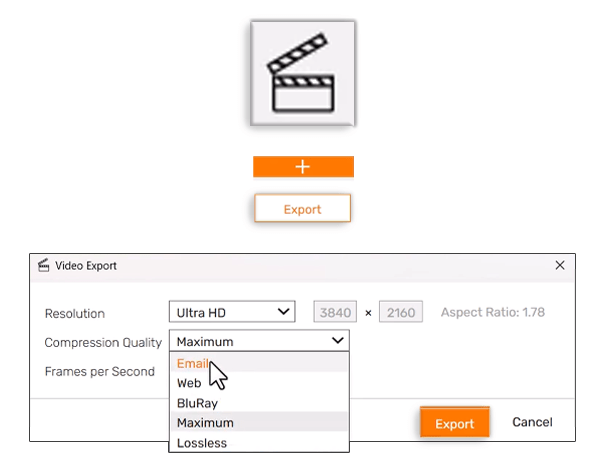
10. Export Images, Videos, or Panoramas
For a still image, use the screenshot/render image button in the Enscape viewport. For Revit workflows, Enscape can also render an image into the Revit document so it appears in the Project Browser’s Renderings folder. For animation, open the video editor, create keyframes, preview the camera path, and export the final file.

For videos, keep the path simple. A slow, intentional walkthrough is usually stronger than a long path with too many turns. Before exporting, check reflections, flickering materials, exposure changes, and people or vehicles placed too close to the camera.
Want to compare Enscape with Revit’s native rendering workflow? See our guide on how to render in Revit. If you need immersive review tools, also check these Revit VR plugins and applications.
Best Practices for Better Enscape Renders
The biggest mistake is treating Enscape as a magic render button. It is fast, but it still rewards clean modeling, good camera choices, believable materials, and controlled lighting.
- Use section boxes for focused views. They reduce visible geometry and make interior review easier.
- Keep BIM standards intact. Use families, family types, worksets, phases, filters, and view templates instead of presentation-only model hacks.
- Fix material scale before final output. Oversized wood grain, tiny brick, and wrong bump depth quickly make a render feel unprofessional.
- Use fewer, better assets. Place people and furniture where they explain scale, circulation, and program.
- Render drafts first. Test composition and lighting at lower quality before spending GPU resources on final exports.
- Check the image at real size. A render that looks fine zoomed out can have noisy glass, jagged edges, or weak texture detail at final resolution.
Fix Common Enscape Revit Problems
The Enscape tab is missing in Revit
Close Revit, uninstall Enscape, restart the computer, install the latest Enscape version again, and reopen Revit. Also confirm that your Revit version is supported by your installed Enscape version.
The Start button is greyed out
Create or select a valid 3D view. Enscape cannot start from every Revit view type, and the ribbon buttons may stay inactive until a proper 3D view is active.
Enscape opens but the render is dark
Check time of day, exposure, artificial lights, material colors, and whether the camera is inside geometry. For interiors, add realistic light sources and balance them with daylight instead of only increasing exposure.
Enscape is slow or crashing
Update GPU drivers, reduce render quality while navigating, close heavy applications, use a section box, simplify unnecessary geometry, and check VRAM usage. Large scenes, high-resolution textures, complex assets, and ultra-quality exports can exceed older GPUs.
The camera does not match the Revit view
Turn on Synchronize Views to match Revit’s camera. Turn it off after alignment if you want to move freely in Enscape without the camera resetting.
Assets or materials do not load
Check internet access, license status, Chaos services, firewall rules, and whether the asset or material library is available in your installed version. If the issue started after an update, reinstalling Enscape often fixes missing service or library links.
10 Inspiring Enscape Renderings
The tutorial above is the core of the page, but examples still help readers understand what Enscape can produce from architectural models. Use these images as visual inspiration for composition, lighting, entourage, and presentation mood.
1. R.S House by in.Lab Architects

2. Airport Terminal by Sang Bui

3. Exterior House by Enscape Anarchivn

4. Modern Dining by Samiat

5. Madison Square Garden by Mm3d Arsitektur

6. Water Feature by Joel Guerra

7. Interior by Jason Hu

8. Interior by QuangVinh-Zin

9. Pirouette Bridge by Sang Bui

10. Exteriores PFC by Leandro Arias

FAQ
How do I open Enscape in Revit?
Open a Revit project, select a valid 3D view, click the Enscape tab in the Revit ribbon, and press Start. If the Start button is greyed out, you are probably not in a supported 3D view.
Why is the Enscape toolbar missing in Revit?
The most common cause is an incomplete installation or an unsupported Revit/Enscape version combination. Close Revit, reinstall Enscape, restart the computer, and confirm that your Revit version is listed in the official Enscape system requirements.
Can I use Enscape with Revit LT?
No. Enscape is not provided as a plugin for Revit LT because Revit LT does not allow third-party plugins. You need the full Revit application.
What is the best quality setting for Enscape?
Use Medium or High quality while navigating and reviewing the design, then switch to Ultra for final still images if your GPU can handle it. This keeps the live viewport responsive while still allowing high-quality final output.
Is Enscape better than native Revit rendering?
Enscape is usually faster for real-time walkthroughs, design review, and quick presentation images. Native Revit rendering is still useful when you want to stay entirely inside Autodesk’s built-in rendering tools. The best choice depends on whether speed, interactivity, or built-in workflow matters more for the task.
Next, you can continue with Revit 3D views, compare the native workflow in rendering in Revit, or explore Revit VR plugins for immersive presentations.
References
- Chaos Blog: How to Use Enscape in Revit
- Chaos Docs: Enscape for Revit Documentation
- Chaos Help Center: Enscape System Requirements and Recommended Hardware
- Chaos Docs: Enscape Release Notes for Windows
- Chaos Blog: Using Enscape with Revit Without Breaking Your BIM Model
- Autodesk Support: Revit 2027 System Requirements
- Google Search Central: Title Link Best Practices
- Google Search Central: Documentation Updates and FAQ Rich Result Deprecation
Mohamed Fakhry has helped thousands of architects and designers find their next project with step-by-step guidance on his blog, mashyo.com. About Mohamed
His journey began during his university years when he recognized the need for information-rich 3D models to accelerate learning and improve production processes. Now, Mohamed shares his expertise through Revit tutorials that are accessible to all.
