Looking for a way to simplify your work in Revit? Try PyRevit!
PyRevit is a free and open source add-in for Autodesk Revit that provides a set of tools to improve user productivity.

Built on top of the Revit application programming interface, it allows users to automate repetitive tasks, customize the user interface, and extend the functionality of Revit.
How can I use PyRevit with Revit 2024 or earlier? What if I’m not a programmer and still want to take advantage of this tool?
In this post, I’ll show you how to use PyRevit. I’ll also introduce you to some of its best tools in Revit.
How to Use PyRevit
Step 1 – Install PyRevit
Download the latest version from the PyRevit develop commits.
Go to the pyRevit develop commits and then select the checkmark action in front of the commit header. Then click on the “Details” link for the pyRevit build.

This will take you to the results page and you can download the installer by clicking on its name.

Note: WIP builds are not official releases.
Step 2 – Launch Revit
Once you’ve installed PyRevit, launch Revit. You should see a new PyRevit tab on the Revit ribbon.
Step 3 – Explore the Tools
Hover with your mouse pointer over each tool to see a tooltip that explains what it does and how to use it.
Now that you’ve installed PyRevit and launched Revit, you’re ready to explore the tools. Let’s take a look at 20 of the best PyRevit tools.
20 Best PyRevit Tools
Here are some of the best Revit tools that you can access with PyRevit. These are not all the tools available, but some of the most popular and useful ones.
1. Color Revit Tabs
Color the tabs of your open Revit documents based on their type.
- Go to the PyRevit tab > drop-down PyRevit panel.
- Click Settings.
- Change the Project Tab and Family Tab Styles.
- Click Just Save Settings.
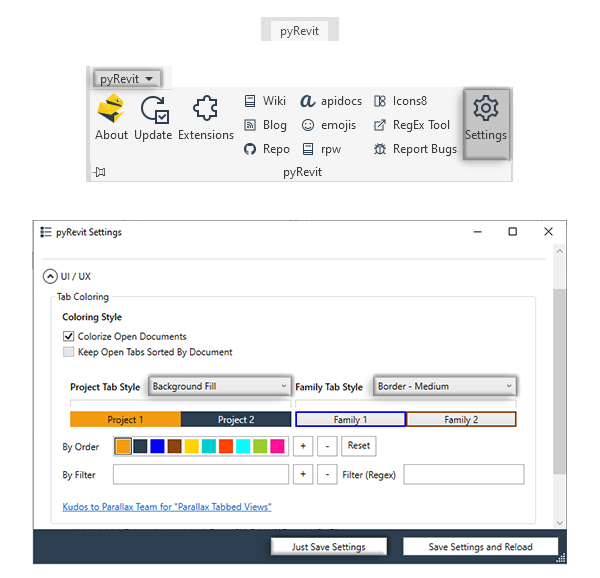
This can help you quickly identify and switch between different active views and projects.
2. Make PAT Pattern
Create custom fill patterns directly INSIDE Revit without using external applications.
To draw the pattern:
- Go to the View tab > Create panel > click Drafting View.
- Name the view > click OK.
- Go to the Annotate tab > Detail panel > click Detail Line.
- Draw a rectangle with the pattern inside it.

To save the pattern:
- Select the pattern.
- Go to PyRevit tab > Modify panel > click Make Pattern.
- In the Make Pattern window, Type a name for the pattern.
- Click Create Pattern.
- Click opposite corners of pattern.
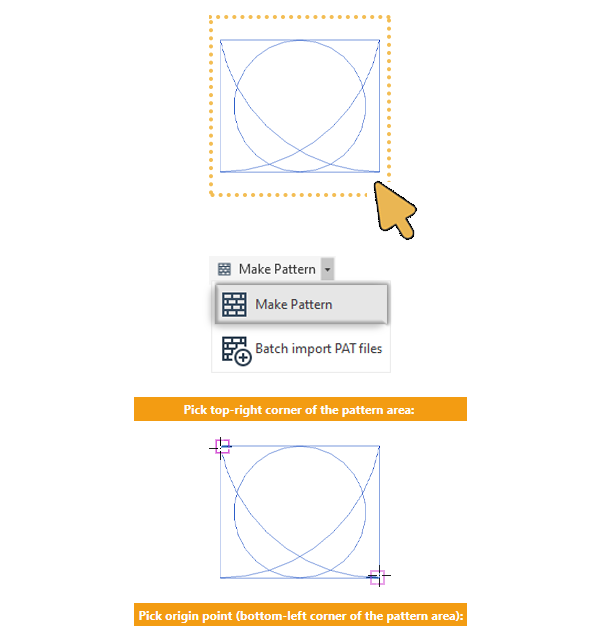
You can draw detail lines and arcs using Revit sketch tools and convert them into a pattern definition file (.pat). Learn more about Hatch Patterns

3. Match Anything
Copy graphic override settings (such as visibility, transparency, color, line weight, and line pattern) from one element to another or to multiple elements.

This can help you quickly apply consistent graphic styles to your elements without having to manually adjust each one.
Learn about the classic match type properties tool
4. Find Referenced Elements
Find out what other elements are linked to a selected element in Revit, and what would happen if you deleted that element.
To view elements related to the source element:
- Select the element.
- Go to the Analysis panel > drop-down Inspect menu.
- Click Find Referenced Elements.
The tool will show you a dialog box with the list of linked elements. You can see the type, name and ID of each element. You can also click on the clickable links to select and highlight the elements in your model.

This will help you avoid unintended consequences and errors when modifying or deleting elements in your model.
The linked elements may be in different views or categories than the selected element. For example, if you select a wall, you may see windows, tags, dimensions and other elements that are related to that wall.
5. Preflight Checks
Run a series of checks on your Revit model before publishing or submitting it. The tool will report any issues or warnings that require your attention and provide suggestions for resolving them.

You can choose from a list of predefined checks (Model Checker, Warnings, Reference Plan Lister, and Schedule Not on Sheet Lister).
6. WHO DID THAT??
Find out who created or modified an active view or an element in a workshared model.
- Select an element
- Go to the Project panel > drop-down Team menu.
- Click “Who did that??”.
- Select a command.

It also shows you when and how the item was modified. A very useful tool for tracking changes and resolving issues in a collaborative environment.
7. Batch Sheet Maker
Create multiple sheets at once using a template sheet and a list of sheet names and numbers.
To create a large number of sheets at once:
- In Drawing Set panel, drop-down the Sheets menu.
- Click Batch Sheet Maker.

8. Set Revisions on Sheets
Assign revisions to sheets in bulk using various criteria, such as sheet number range, view type, discipline, or category. Learn more about Revit Revisions
To set revisions on sheets:
- In Drawing Set panel, drop-down Revision menu.
- Click Set Revisions on Sheets.

If you have a large set of documents, it can be very long and tedious to manually apply the revision to all the sheets. So this is such a time saver.
9. Copy Revisions to Open Documents
Find and copy any revision in a Revit document to another document.
To copy revisions across different projects:
- In Drawing Set panel, drop-down Revision menu.
- Click Copy Revisions to Open Documents.

10. Print Ordered Sheets
Print sheets in a specified order based on sheet number, name, or index.
“Sheet List Schedules” are like an index for your sheets. You can filter this list to show only sheets with a certain revision.
- In the drawing set panel, click Print Sheets.
- Drop-down Sheet Index menu > select the schedule list.

PyRevit allows you to print sheets from a specific sheet list to ensure that you print the correct sheet list in order.
Learn the classic way to print sheets from PDF
11. Add Views to Sheets
This tool allows you to add views to a sheet in a batch mode.
- In the Drawing Set panel, drop-down Views menu.
- Click Add Views to Sheets.

12. Set Workset
change the workset of elements in bulk using various criteria such as category, family, type or parameter.
To set a workset based on elements selection:
- Select the element whose workset you want to activate.
- Go to the Selection panel > click Set Workset.
This can help you isolate or focus on specific elements in a workset without affecting other views or worksets. Learn more about worksets
13. Copy Legends
Copy legends from one document to another or multiple documents that are open in Revit.
To copy legends across projects:
- In the Drawing Set panel, drop-down Legends menu.
- Click Copy Legends to Other Documents.
Since legends are not elements that you can normally copy, this tool will save you a lot of time. Learn more about Revit legend
14. Copy State to View
Copy a view’s settings (such as hidden elements, temporary hide/isolate, section box and crop region) from one view to another or multiple views.
To copy view settings:
- Open the first view.
- In the Selection panel, click Copy State.
- Open the second view.
- In the Selection panel, click Paste State.

This can help you quickly apply consistent visibility settings to your views without having to manually adjust each one. Learn more about the View Control bar tools
15. Pick by Category
This tool allows you to quickly select a group of items based on their type.
- In the Selection panel, click Pick.
- Select the category.

You can see a list of categories and subcategories and select them by clicking on them.
16. Wipe Category
Delete all of the unused or unnecessary data in your current document.
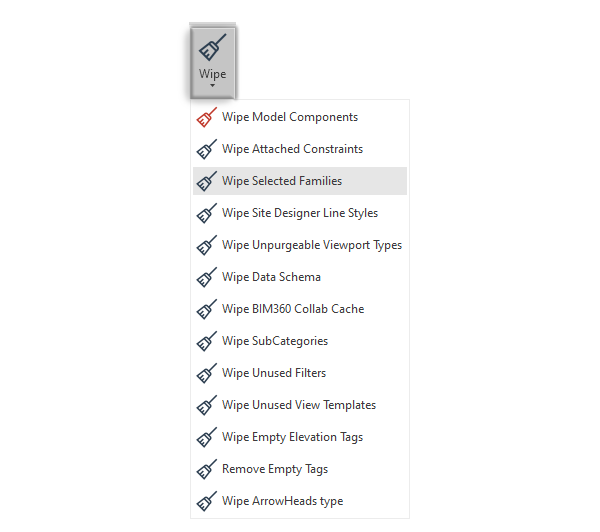
This can help you quickly remove unwanted elements from your model without selecting them individually. Learn how to purge elements
17. Sync Views
Align the crop regions of two or more views in Revit.
To sync views extents:
- In the Toggles panel, click Sync Views.
- Any navigation you perform in a drafting view is automatically performed in all of the other views.

Learn how to navigate and zoom in the classic way
Very useful for getting consistent zoom across all viewports to create accurate drawings.
18. Move Viewport
Move a viewport from one sheet to another.
To transfer viewports:
- Open the source sheet.
- Go to the Drawing Set panel > drop-down Sheets menu.
- Click Move Viewports.
- Choose a destination sheet from the list.
- In the options bar, click Finish.

19. Pin Viewports
Pin or unpin viewports on sheets in bulk. This allows you to ensure that no changes are made to the views in any of the finished sheets.
To pin contents of multiple sheets:
- In the Drawing Set panel, drop-down Sheets menu.
- Click Pin All Viewports.

20. Overkill Double Lines
Delete duplicate lines in your model that can cause printing or performance problems.
Remember AutoCAD’s Overkill command? This is its equivalent in Revit, allowing you to delete specific types of lines (detail or model) or all types, with an option to consider line weights.
To remove duplicate lines:
- In the Modify panel, click Overkill.
- Select the line type.

I hope this article has encouraged you to get started with PyRevit. Let me know your thoughts and favorite tools in the comments.
Mohamed Fakhry has helped thousands of architects and designers find their next project with step-by-step guidance on his blog, mashyo.com. About Mohamed
His journey began during his university years when he recognized the need for information-rich 3D models to accelerate learning and improve production processes. Now, Mohamed shares his expertise through Revit tutorials that are accessible to all.
