The underlay feature in Revit allows you to display all elements of another level in your active plan view.
Elements in the underlay level appear behind the active plan view as a halftone layer (gray).
Wondering how to add underlays to your floor plans? Here’s a 5-step guide.
Adding An Underlay
In this example I open the reflected ceiling plan of Level 2, and then add the floor plan of Level 2 as an underlay to see MEP components whilst setting up the skylight on the ceiling.
To add an underlay to the view:
- Go to the Properties palette > Underlay.
- Drop-down “Range: Base Level” to select an underlay.
- Click Apply.

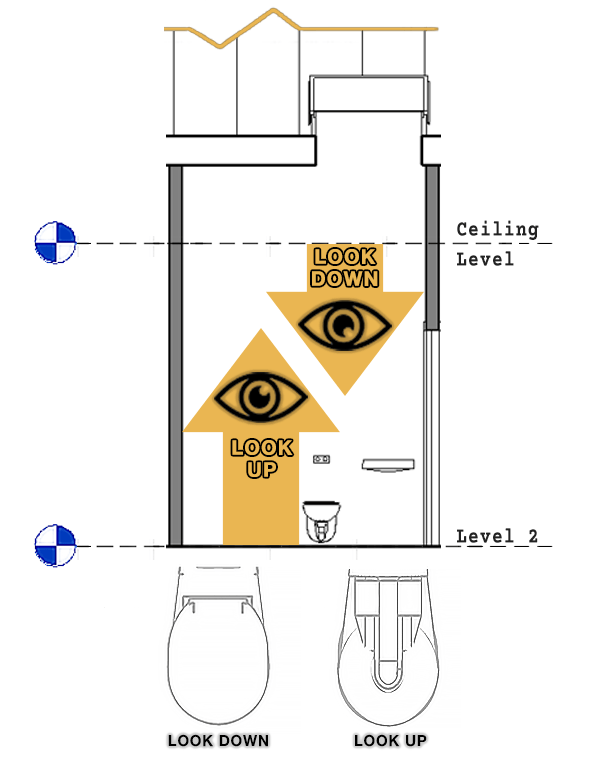
There are two types of underlay orientation: looking up or looking down.
✨ Tip: Use underlays for coordination and construction. If you are wondering how they are different from other features, read our post on view range of reflected ceiling plans.
Visibility Settings
To change the underlay color and line pattern:
- Go to Manage tab > Drop-down Additional Settings.
- Click Halftone / Underlay.
- Change settings of line weight, pattern and brightness.
- Click OK.

If you check “Apply Halftone”, all the lines of the underlay become gray. The slider controls the halftone color.
Selecting Elements
To select underlay elements:
- Go to the Selection Toggles bar.
- Click Select Underlay Elements.

Underlay VS View Range VS Halftone
There has been a lot of uncertainty about whether and how to use an underlay versus customizing the view range.
Although underlays are controlled individually, view templates allow you to change the orientation within multiple views.
Table 1 contains a comparison of definitions and functions.
| Underlay | View Range | Halftone | |
|---|---|---|---|
| Function | An option to display elements of another level below or above your active level view. | A view setting where you specify extents of the view up and down. | The default style of underlay lines. |
| Extents | Select the entire view of another plan to display under the active plan view. | Displays elements on the lower and higher levels (e.g. stairwells and auditoriums). | Applies to underlay. For view range elements, you need to adjust the “Beyond” line style. |
| Printing | Printed when enabled and need to be managed for each view. | Prints as it appears in the viewport. | Uncheck “Replace halftone with thin lines” in the Print Setup window. |
When The Underlay Is Not Displaying
Tips to show an underlay in your plan view:
- The “below level” for View Range cannot be the same as the underlay base level.
- If you create the elements on a floor in the Project Completion phase, they will not appear in a view of an earlier phase.
That concludes the underlay feature in Revit!
Did you get value from this post? Please share it because it will help others.
Mohamed Fakhry has helped thousands of architects and designers find their next project with step-by-step guidance on his blog, mashyo.com. About Mohamed
His journey began during his university years when he recognized the need for information-rich 3D models to accelerate learning and improve production processes. Now, Mohamed shares his expertise through Revit tutorials that are accessible to all.
