It used to be a hassle, but in Revit 2021, you can add a slope parameter to walls and host components on their sloped surface with a single change to their settings.
Sloped (Slanted) walls are walls that are not vertical but instead are angled or inclined. These walls can be used to create architectural elements such as sloping retaining walls, angled partitions, or other non-vertical structures.

This guide will walk you through the process of creating them, step by step, and remember, angled walls are more than just an aesthetic choice, they can:
- Enhance natural lighting and ventilation.
- Optimize space in irregularly shaped plots.
- Create dramatic architectural features.
- Improve structural efficiency in certain designs.
Let’s get started…
Step 1: Set Up Wall
Section views are ideal for seeing angles clearly after adding the wall, while plan views offer better control over placement.
To set up your wall:
- Open a plan view.
- Navigate to the Architecture tab > Build panel > Wall.
- Left-click to add the start point of the new wall.
- Move the pointer to the desired end point.
- Left-click again to apply the wall to the project.

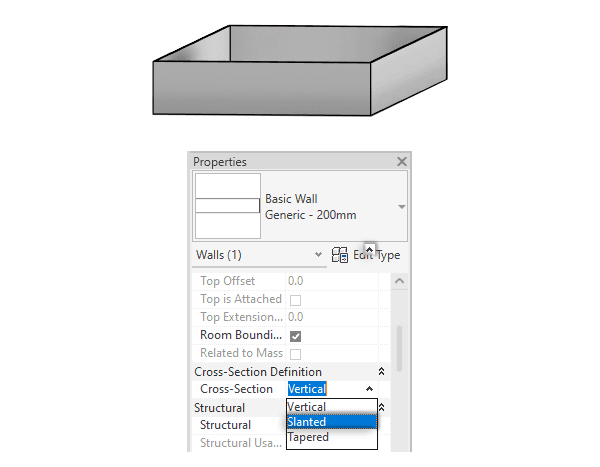
Step 2: Switch to Slanted Mode
Revit’s cross section parameter allows you to switch from standard vertical walls to sloped walls. This setting unlocks the ability to control the angle of the wall.
To enable slanted walls:
- Go to the Properties palette > Locate the Constraints category.
- Find the Cross-Section parameter and change it to “Slanted”.
- Watch for the “Angle From Vertical” parameter to appear.
Note: If you don’t see these options, ensure your wall type supports slanting. Not all wall families are designed for angled configurations.
Step 3: Set Angle
The “Angle From Vertical” parameter determines how much your wall leans. Understanding the angle direction is crucial, it’s based on the direction you draw the wall. Think of it like a clock:
- Positive angles lean to the right.
- Negative angles lean to the left.
To set your angle:
- In the Properties palette, locate “Angle From Vertical”.
- Enter a value between -90° and +90°.

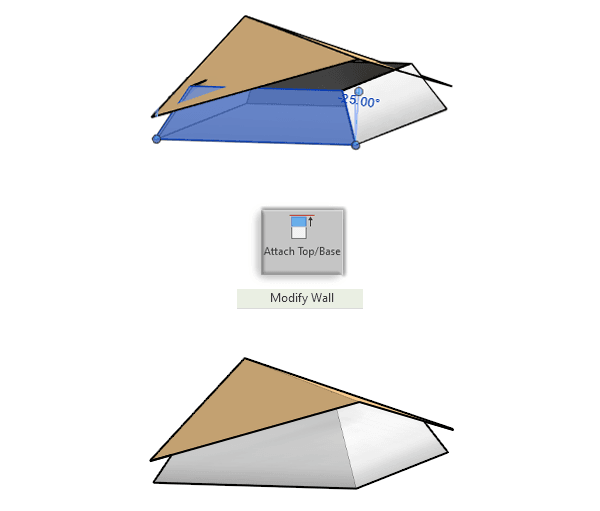
To test the capabilities of sloped walls, you can create a sloped ceiling or roof and then attach it to the walls for a unique result.
Step 4: Fix Openings
Doors and windows in slanted walls require manual adjustment since they remain vertical by default. Aligning these elements with your wall’s angle ensures a realistic and functional design.
To adjust wall openings:
- Select the door or window.

- In the Properties palette, change the “Orientation” parameter to “Slanted”.
- Click Apply.

Lastly, here are a few tips:
1- Use Reference Planes: For complex designs, draw reference planes to guide your wall placement and ensure consistency. Read more about Reference Planes
2- Leverage 3D Views: Visualize your angled walls in 3D to catch any alignment issues early.
3- Test in Sections: Use section views to verify that your angled walls align with other elements in the design. Learn how to create section views
4- Check Structural Integrity: Ensure your slanted walls are properly supported and documented in structural plans.
5- Document Clearly: Add dimensions and annotations to your angled walls to avoid confusion during construction.
By understanding this feature, you can create dynamic, Revit angled walls that bring your vision to “BIM” life.
Mohamed Fakhry has helped thousands of architects and designers find their next project with step-by-step guidance on his blog, mashyo.com. About Mohamed
His journey began during his university years when he recognized the need for information-rich 3D models to accelerate learning and improve production processes. Now, Mohamed shares his expertise through Revit tutorials that are accessible to all.
