A matchline in Revit is an annotation line that allows you to divide a large view into smaller parts and link them together with tags. This can help you create more detailed and organized drawings for complex projects.
Matchlines show where two views split on a primary view. A view reference is the linking tag that provides automatic numbering and instant access to other views.
What is a matchline tag?
A matchline tag consists of a line (dashed by default) that can be associated with a label that displays the name and number of the referenced view.
You can use it to link multiple views of the same model, such as floor plans, sections, or elevations.
It helps to show how a large floor plan is divided into smaller parts, and how each part corresponds to a different view on a sheet.
In the next four-step tutorial, you’ll learn how to add a matchline, edit its line style, and add reference tags to both views to link them.
How to use Matchlines
Duplicate your view, add a matchline tag, edit its appearance, and then add a view reference to each split view.
Step 1 – Duplicate view
Create a duplicate of the view that you want to split into smaller parts.
- Right-click the view name in the Project Browser.
- Duplicate the view twice and rename new views accordingly.
- Open each view and activate the Crop Region in the properties palette.
- Click on the boundaries to control the region.
- Right-click the boundary of the region.
- Drop-down Hide in View menu > click Element.
Learn more about duplicating views

✨ Tip: If you want to display multiple viewports on your screen, go to the View tab > Windows panel > click Tile Views (shortcut: WT).
You can also rename the duplicated view to make it easier to identify. For example, if you want to split a floor plan into four parts, you can name the duplicated view as Floor Plan – Part 1.
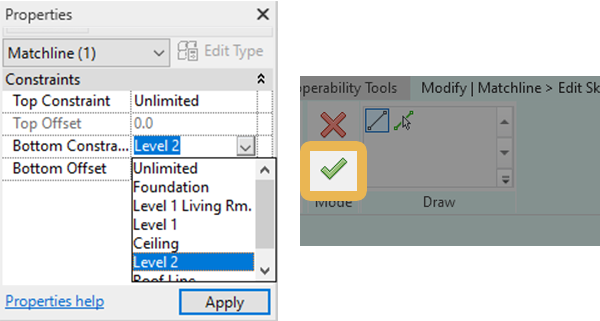
Step 2 – Draw a matchline
Add the matchline annotation to indicate that the view is split.
- Go to the View tab > Sheet Composition panel > click Matchline.
- Draw the line in one of the viewports.

- Set Top Constraint and Bottom Constraint.
- Click Finish Edit Mode.
✨ Tip: Did you know that break lines can cut off long parts and objects in a drawing? Learn more about Revit break lines
Step 3 – Edit matchline visibility
Use the Object Styles method to change the appearance and visibility of matchlines for the entire project. This means that any changes you make will affect all views that contain matchlines and view references.
To change the matchline visibility:
- Go to the Manage tab > Settings panel > click Object Styles.
- Open the Annotation Objects tab.
- Search Matchline in this list and assign new preferred properties.
- Click OK.

Alternatively, you can use the Visibility Graphic option to change the appearance of the matchline tag in specific views or sheets. This means that any changes you make will only affect the current view or sheet that you are working on.
To change the visibility settings in specific views:
- Go to the View tab > Graphics panel > click Visibility/Graphics.
- Open the Annotation Categories tab and scroll down to Matchline.
- Check or uncheck the boxes to show or hide the tags.
- Change subcategories such as line style, weight, and color.
- Click OK.
Step 4 – Add View References
Add view reference tags to number and link each page of the view.
A view reference is a graphical representation of a view in another view. It allows you to reference a portion of a view in another location within the same project or even in a different project.
To add view references:
- Go to the View tab > Sheet Composition panel > click View Reference.
- In the Modify | View Reference tab, Set Target View to link the reference.
- Insert the annotation into the viewport.

The tag displays view number and sheet number (if the view is on a sheet).
✨ Tip: To load the (M_View Reference.rfa) tag annotation, go to Insert tab > Load from Library panel > click Load Family. Locate the family in C:\ProgramData\Autodesk\RVT 20XX\Libraries\English\US\Annotations.
Learn more about annotation symbols
A matchline is a symbol for split Revit views, while the view reference is an automated view linking and numbering tool and an annotation that you can interact with as a viewer. After printing to PDF, clicking a reference tag in the PDF document switches the view to the linked reference.
Mohamed Fakhry has helped thousands of architects and designers find their next project with step-by-step guidance on his blog, mashyo.com. About Mohamed
His journey began during his university years when he recognized the need for information-rich 3D models to accelerate learning and improve production processes. Now, Mohamed shares his expertise through Revit tutorials that are accessible to all.
